Greetings visitor! Welcome to my ugly but hopefully helpful page. This was inspired in part by the project page at DW8000.com
, however that one was for the EX-8000 and I needed to work on a DW-8000, which has a much tighter area to fit! So now you can see how it goes for that!
DISCLAIMER: Don't do this if you are not competent or don't feel comfortable with basic electrical wiring and soldering.
Situation:
A common problem is coming across a KORG DW-8000 without a cord on ebay perchance (as in my case), or losing your own during a move or something. While you can buy a replacement cord from a number of places for about $15 to $20 shipped (Sam Ash, or Syntaur.com, ebay or elsewhere) another perhaps more optimal and inexpensive solution if you are handy with basic tool work is to install a 3 prong IEC socket in place of the original. Then you can use near any computer cord, and also enjoy longer lengths as well as easier replacement. You can get the necessary socket from a burnt up computer power supply, or at a place like All Electronics (link may expire over time). I highly recommend All-Electronics for a great many needs, they have great prices and fast shipping.You can also pick up some EL panels, and re-do your KORG N264. (Next project)

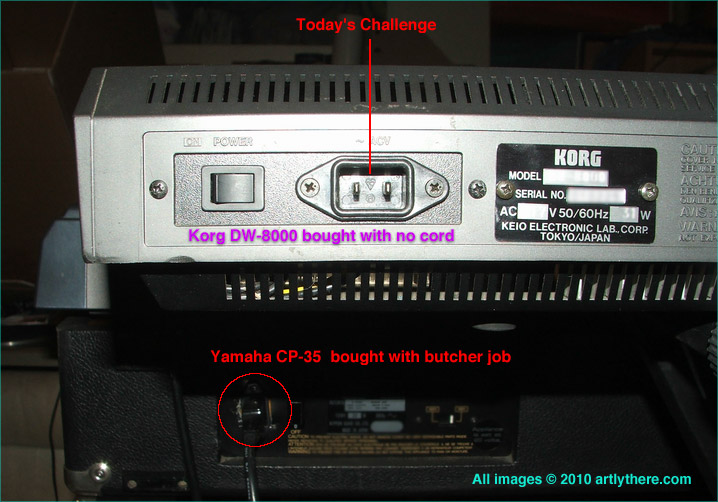
What do we have here? An ebay special DW-8000, bought with no cord. They cost more than I want to spend. And I don't want to wait for one to show up in the mail. What's that below? A Yamaha CP-35, also gotten on ebay, where the seller conveniently didn't mention the hatchet job either they, or the prior owner had done. I'll have to try to do a restoration on that later, it's bent all to heck.
HMMMMMM.
Well, I said I don't want to wait, but despite having a nice enough 3 prong socket laying around here in a working power supply, my brother had a better burnt up one to scavenge. After, ahem, waiting a week for that, and then paying some "postage due" to ransom the envelope containing it because the Bro under-estimated the postage , WE WERE READY TO ROLL! Woohooo!
Wait a minute, Bro included birthday presents and cash prizes. Worth the wait now. WooHooo! He ain't tardy, he's my brother! But I was tired of waiting so:
MISSION:Possible REPAIR KORG DW-8000 commenced immediately!
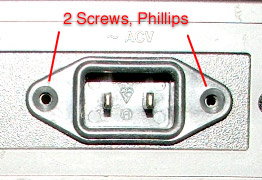
You'll want to first remove the 2 screws holding in the original socket. You'll find that it pulls out easily.
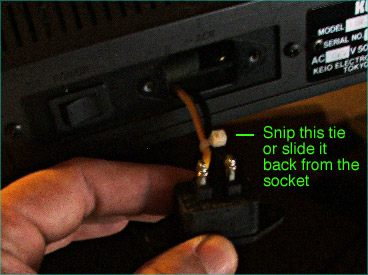
Exposed now are 2 wires, a yellow and black, tied together with a plastic tie. You can slide this back, or do as I did, cut it away.
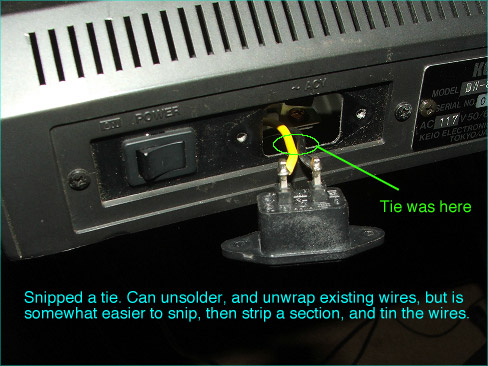
Now you need to decide how to approach the removal of the original socket. You'll want to either use a desoldering tool, and carefully unwrap what's there, or if enough wire is available, you can snip it close to the socket, and then re-strip the yellow and black wires. If you do that, you'll need to tin the wires with your soldering iron before the socket can go in.
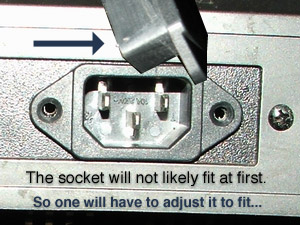
The 3 prong socket will need some adustment, most likely. You can open up the metal where the socket goes, but that's messing with vintage too much for me. I sanded down the top and bottom and sides and corners of mine carefully, using a flat file. You might want to use a Dremel or other tool, but be careful. To prevent the edge of the file taking down the flange too much, I covered the edge of the file with some masking tape, as needed.

It might seem daunting at first, but careful sanding will yield a fine and easy fit eventually. Your socket walls should not be thinned to the extreme (nor do they need to be). Took me 20 minutes of slow work. Don't breathe the sanded socket dust, or you'll make funky web pages with all manner of oddly cropped images.
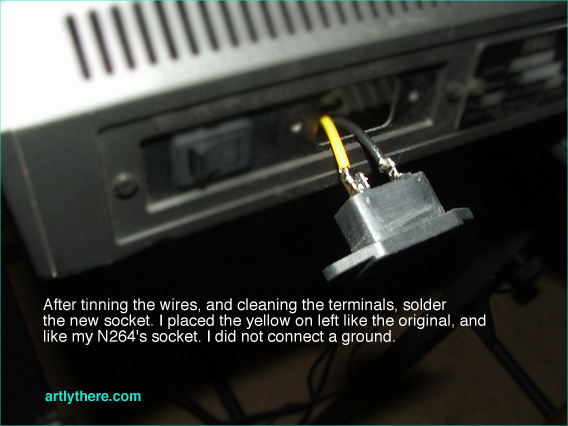
Once you have a good fit, you don't want it too tight, but not too loose either, you can then solder the wires back onto the terminals of the socket. I followed the convention of my other keyboard, with flat side up, and with the yellow wire on left, same as the original. Solder carefully after wrapping the wires back through and around the terminal, and make sure you get a good joint (shiny), not a cold one. (dull) Don't breath the smoke if using a rosin core solder, or you'll make funky web pages with all manner of oddly cropped images.

The wires were taught enough inside that I did not need a new tie (and I couldn't find my small ones) so I just stuck the socket back in, and screwed it in gently. It seated nicely, but you won't get a good fit if you oversand the flange, so be wary as you do the sanding. Exhale! You're done!
Enjoy your glorious new socket and handy interface to the modern world!
What? You don't have a computer cord now? Oh GEEZ. Hit the Radio Shack, and be happy. At least 3 prong cords can be had locally!
Page and images Copyright 2010 Artly There. If you need any help doing your own conversion, fire off an email using any link from the site here or at2004 (a-t) artlythere-do-t-co-m (do the e-math) :) Say, do you use a Mac? Try Compositor!
Page last updated July 21, 2010 way late in the morning. Early. Whatever. Too early.